MEDIAART 2G03: Noise Strategies
Noise in a typical recording situation
The following diagram shows a very typical recording situation...
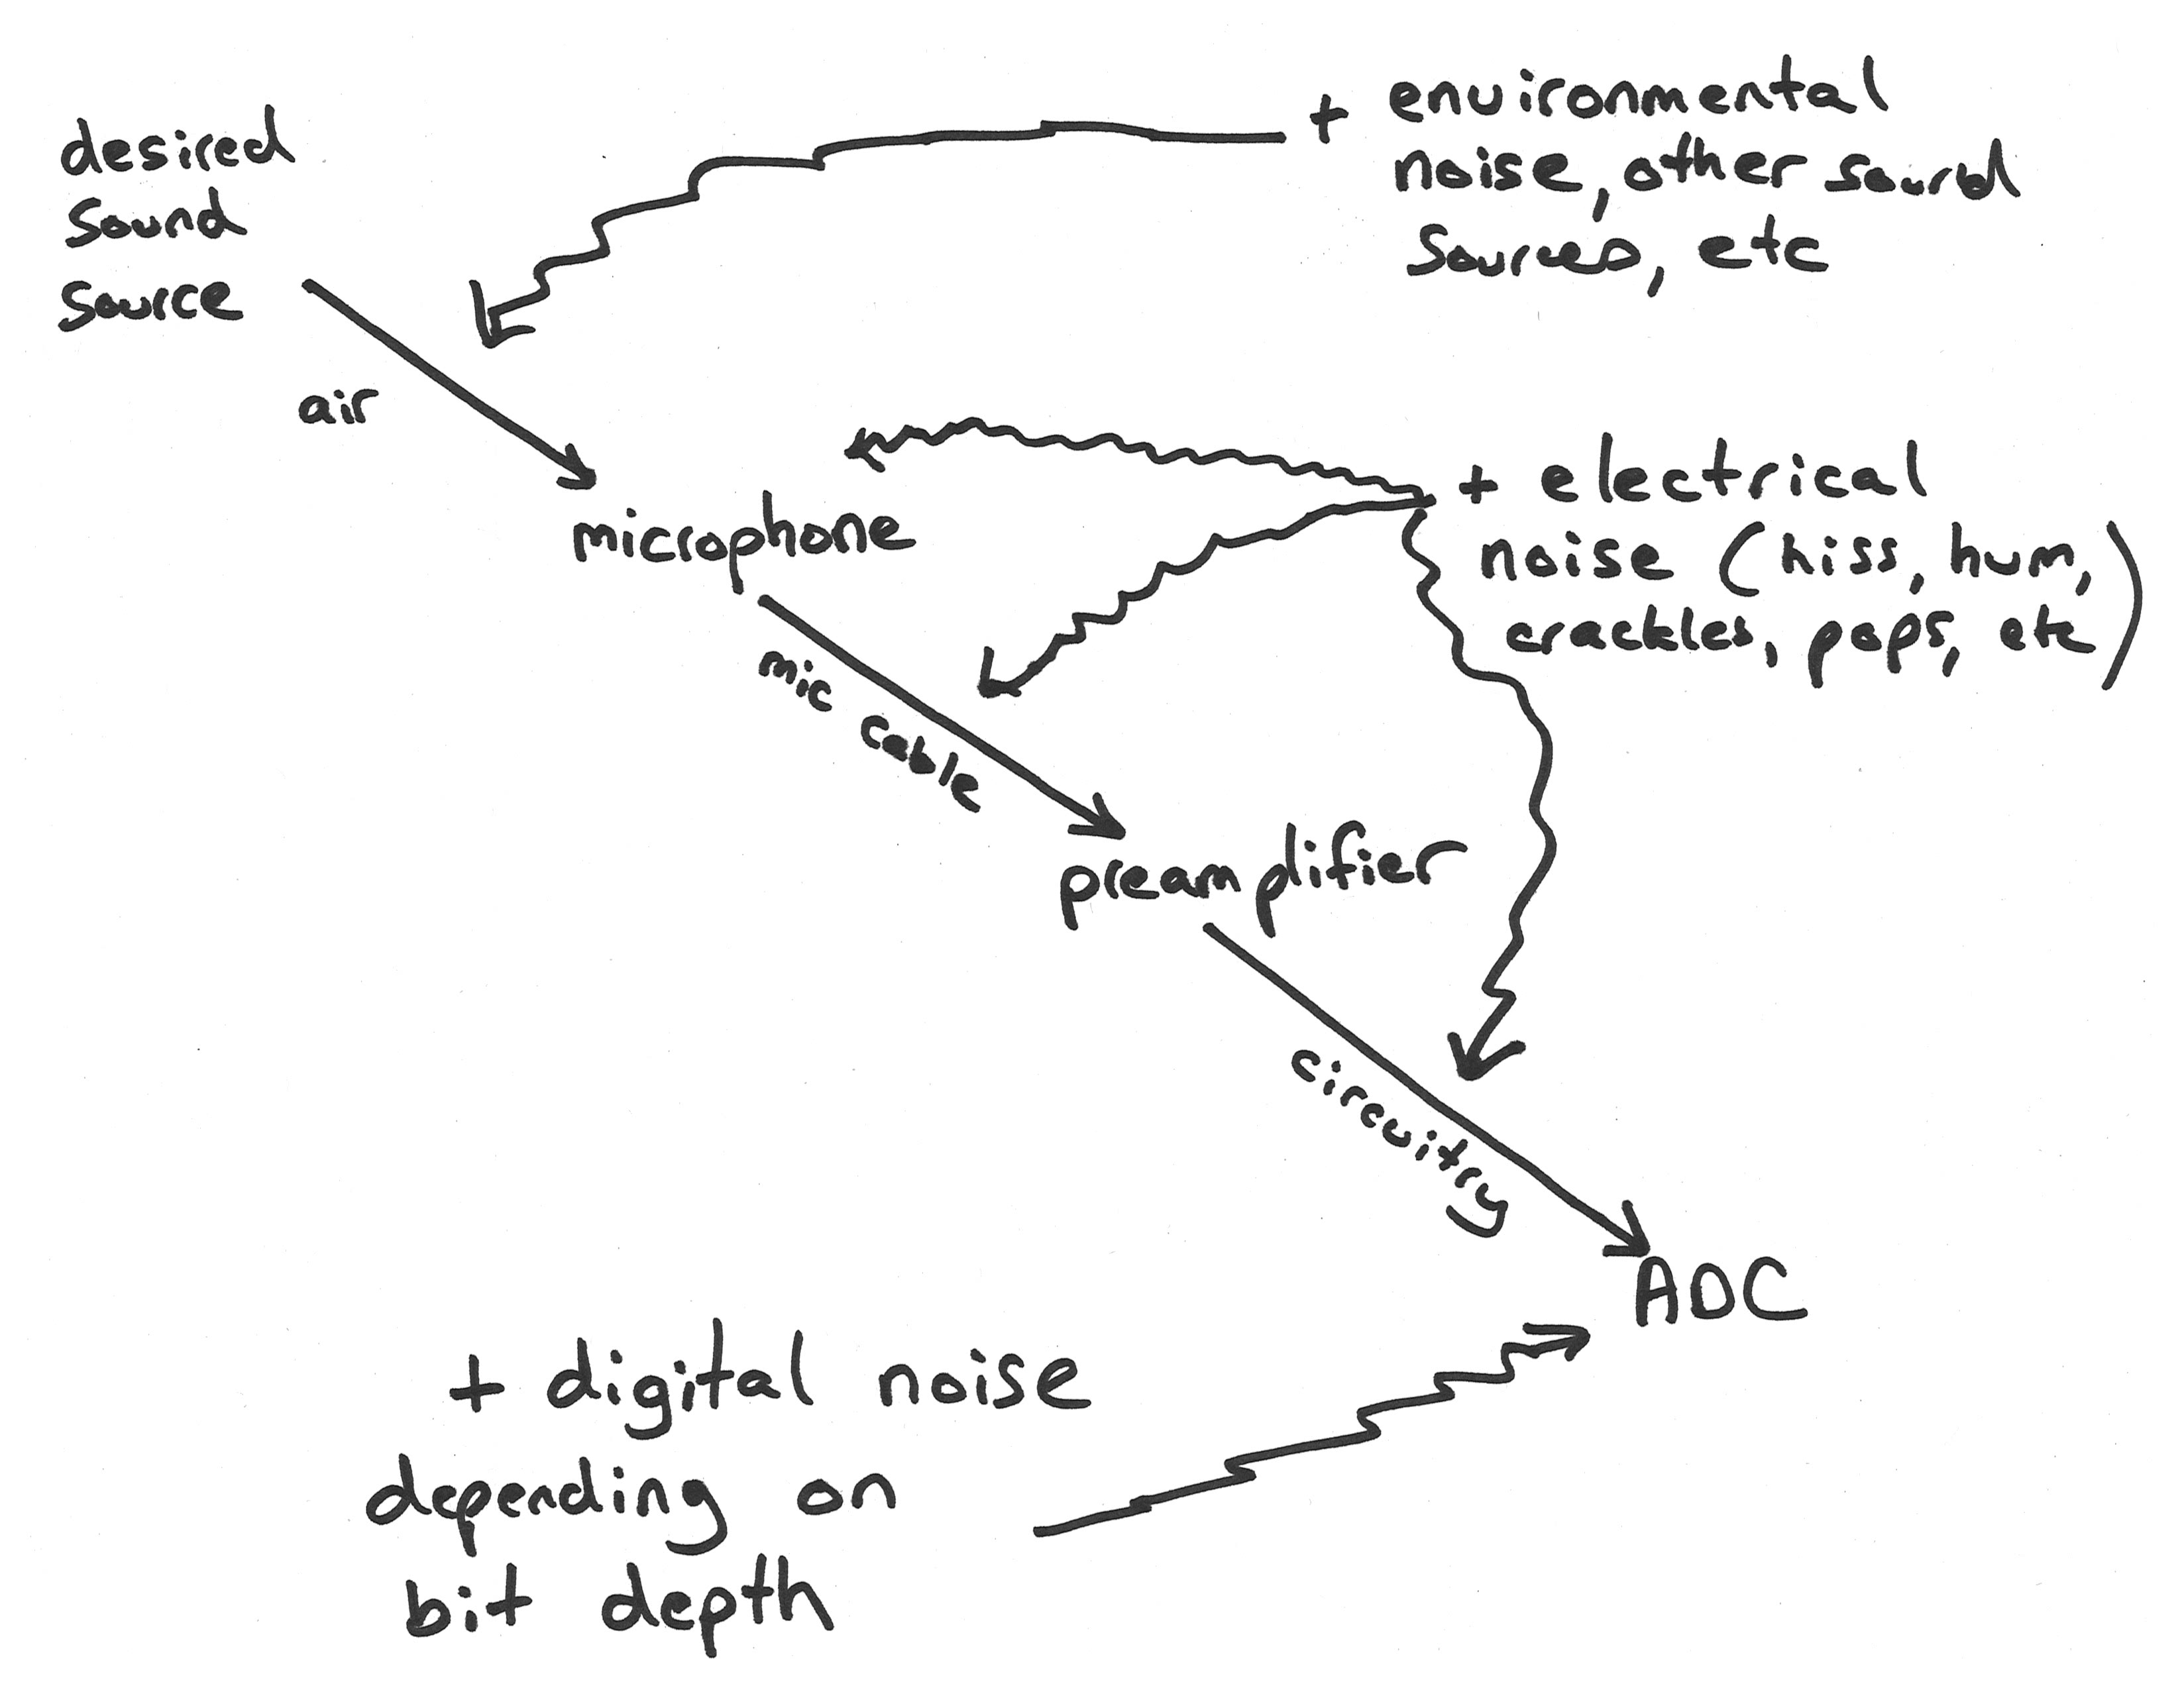
...(above) We have some kind of desired sound source, and we're attempting to capture sounds from that sound source with a microphone, which is connected to a preamplifier, and then to an analog to digital converter. These last two stages are often combined in an audio interface or field recording device or something like that.
At each of the stages of this recording chain, different types and levels of noise or undesired signal are added to the signal that we end up capturing. For example, as the sound energy from the desired sound source makes its way to the microphone through the air, it is joined by all kinds of environmental noise, other sound sources, and so on and so forth. And then when we get to the microphone, which is connected to the preamplifier through a mic cable, and the preamplifier is then connected to the analog to digital converter through some circuitry probably inside the device, and through this whole part of the chain, we have the possibility for electrical noise, most commonly hiss, but it can also be humming type sounds or crackles and pops etc. And then when the sound is digitized or sampled (when it's measured repeatedly), we also have the possibility for some digital noise. In another module, we learn that the amplitude (and so, loudness) of that digital noise depends on the bit depth we are using, with higher bit depths leading to reduced addition of digital noise.
So all throughout this recording chain, we have a bunch of different sources and levels of noise, and so naturally we have lots of different strategies (discussed in the rest of this page) that we can deploy for reducing this and producing cleaner recordings that are more focused on what we want to have in them, rather than things that we don't want to have in them.
1. The most basic strategy for dealing with environmental noise
Our first strategy (and it's really a very basic but powerful one), is to control the situation in which we're recording. If we're trying to record someone speaking, and someone else is speaking at the same time, maybe we can ask the other person not to speak at the same time – that's going to make a huge difference! If we're trying to record in a time or place that is noisy, and we could come back at another time when those noise sources aren't going to be there, I think that would also be an example of controlling the recording situation, and it'll have a big impact on the final result.
2. Reducing environmental noise with microphone proximity and directionality
The typical chain for digital audio recording starts with an environment in which sound sources are making air pressure waves, which are transduced into an electrical voltage by a microphone, then preamplified into a bigger electrical voltage, then measured or converted into numbers by an ADC. Each of these stages has the potential to introduce noise into the signal (in other words, parts of the signal that are undesired). We’ll talk about this in more detail in a later module, but for now, suffice it to say that usually the largest source of noise is other, undesired sound sources in the environment. Energy from all of the sound sources in the environment reaches our microphones, whether we want it to or not, and it's quite easy to have situation where those other sound sources are quite loud indeed!
The inverse distance law, discussed elsewhere, gives us (or describes, anyway) our most powerful tool to control the presence of undesired sound source in the environment. (Well, our most powerful tool apart from controlling those sources themselves – if we are trying to record and someone is making noise, we can ask them to be quiet!). The inverse distance law tells us that if we halve the distance between a source and a microphone, that source will be +6 dB more present (twice as present) in the signal that microphone generates. Conversely, if we double the distance between a source and microphone, that source will be –6 dB as present in the signal at the microphone.
Quite simply, by moving the microphone closer to the source of a desired sound, we will be increasing the presence of that sound in the signal picked up by the microphone. At closer and closer distances, this effect becomes a particularly powerful way of manipulating what is “heard” by a microphone. Imagine, for example, that a sound source is 4 cm away from a microphone. Now imagine we move the microphone, so it is only 1 cm away from the source. 4 times closer = +12 dB = that sound source will be +12 dB more present in the signal.
Another part of the reason why microphone proximity is such an important variable is that, in many situations, when we move a microphone closer to a source, we may not be changing the distance to the undesired/noise sources very much or at all. Imagine recording a voice with a microphone in a busy, urban environment. The noise of traffic, and building heating/air conditioning systems, is quite loud and is not located in any specific place – it is everywhere and nowhere. As we move a microphone closer to a desired source, the level of that source in the signal will go up (potentially, by quite a lot), while the level of the ambient city noise in the signal will stay the same. The result is that our desired signal will be easier to hear over the ambient city noise, in the recording that results.
So, moving microphones close to desired sound sources is a powerful tool for controlling noise, one of the two basic technical challenges we face when recording. Beyond controlling noise, and especially with recordings that have many desired sound sources in them (such as field recordings), microphone proximity is also a way to play with the “mix” of a recording. By moving a microphone closer to or further from particular sources, we can change how present those sources are in the signal that is captured for subsequent work.
3. Reducing environmental noise with microphone directionality
As we hopefully know from the page/module abotu microphones, we have access to directional microphones; in other words, microphones like those with cardioid polar patterns that are somewhat less sensitive in particular directions. And that's going to be our third of our top three strategies for controlling noise, for dealing with environmental noise specifically. When we have sources of noise that are located in specific directions, we can use cardioid microphones or perhaps more esoteric patterns like hyper-cardioid or shotgun microphones, to suppress those noise sources directionally.
4-6. Strategies for electrical noise
Electrical noise (hiss and hums and pops), is not usually as present as environmental noise, but it's usually audible if we listen really closely, if we listen with really high power levels, that kind of thing. It's usually not that hard to find the electrical noise in many recordings. And a consequence of that is that we should accept some level of electrical noise in our recordings, because it is hard to escape completely. However there are strategies we can use that will put electrical noise at a minimum.
As also discussed in the microphones page, our main strategy against electrical noise is to use balanced signals when we are sending sounds from one place to another. It almost seems a bit strange to think of this as a strategy because it's something we just kind of do all the time when we're connecting microphones and other professional audio equipment, but it's a strategy. We use balanced signals and that greatly reduces the presence of electrical noise.
Another strategy (and maybe it seems strange to call this a strategy also), our fifth strategy, is just to use better equipment. One of the major differences between lower quality and higher quality audio equipment is often in its electrical noise specifications. The more expensive, often higher quality equipment, will typically have or will introduce less electrical noise into the signals that passes through it; so use better equipment.
And finally strategy number six (our third strategy for dealing with electrical noise) is something we probably also already have some practice with, and that is the gain structure (i.e. setting recording level, setting preamplifier gain). In other words, when we set an appropriate amount of headroom so that the levels passing through our equipment are high, but not so high that they're clipping or are hitting the maximum, they're likely to be maximally distant from various sources of electrical noise as well.
Strategies for Digital Noise
Digital noise is usually the least strongly present source of noise in our recordings. As a rough rule (developed further in other pages) digital noise goes down by 6 dB for every bit in the bit depth. So if we're using bit depths like 24 bits, that digital noise is really, really, really far away from the maximum: approximately –144 dBFS.
So digital noise is something that's not very strongly present, but we do have some strategies for making sure it stays that way.
The first strategy is just the one we saw previously [in the discussion of electrical noise]: our gain structure, our establishment of headroom. When we have levels that are reasonably close to the maximum, but not so close that we're worried about going over, those levels are as far away as they can be from that digital noise floor.
Another strategy is (and it's something that we kind of do all the time), is that we use high bit depths for rendering projects or for recording new files; for example, 24 bits for a bit depth.
And a final strategy that helps us avoid additional digital noise, is to not make intermediate renders or files whenever possible. Let's say that we have a project and we bring a couple of files into the project, and we do something to them (transform those files), and then we render the result of that to a new digital audio file. At that moment, a little bit of extra digital noise is going to be introduced around the level of the bit depth of our new file. So if we're doing this a lot and then we're having multiple generations of that, this digital noise is going to eventually add up to something that's more strongly present. So by not having intermediate files, by doing most of our work in a single digital audio workstation (DAW) project that we render at the end, we are avoiding adding additional digital noise. This is actually a separate practice in the course (practice #5)...
Reparative strategies
Sometimes we have noisy recordings and we have to use them, and they've already been made. We don't really have any choice about it, we have to use a particular recording... and that's where the final set of strategies – what I'm calling here the reparative strategies – come in. What if the damage has already been done? We've got noisy recordings and we really have no choice but to use them. Well here are our strategies.
I think strategy number nine (ie. After the strategies discussed in environmental, electrical and digital noise modules) would be to edit out the noise, if we can. That's going to work great if it's applicable to our situation.
Strategy number ten would be to use noise gates and expanders. These two techniques, the noise gate and the expander, are closely related. The noise gate is a plug-in, that when the input level goes below a certain level, it cuts out completely. And so we can kind of set a threshold, and then when the levels go above that threshold, we hear something, and when the levels are below the threshold, we don't hear anything. So this can work okay for sound sources like a voice in a quiet room where there's a very clear distinction between the desired sound and the other things that you don't want. But it might not work as well when it's not as clear-cut a distinction between what you want and what you don't want, or when they're closer or more unpredictable in terms of level.
And the expander is really just a variation on the noise gate. A typical expander has a threshold and when the levels are below the threshold, they're pushed down even further, but they're not necessarily completely eliminated. So sometimes this makes possible more smooth or more natural results, than the really extreme in and out action that the noise gate would produce.
Strategy #11 – spectral noise plugins: There are some very fancy noise removal plugins in software nowadays, and most of those plugins are what we would call spectral noise removal plugins. What this means is that the software of the plugin is taking its input signal (its input sound), and it's looking at it as a spectrogram, it's looking at it as a set of frequencies, and then running algorithms on that collection of frequencies to sort of figure out what's noise and what's not noise, to remove that from the spectrogram before turning it back into a plain old audio signal. Now these can work really, really well. The ones that work really well tend to be somewhat expensive commercial software, and they have a key dynamic in them to be aware of, which is that as signals get noisier, and as it gets more and more difficult to tell apart the noise from the desired signal, typically these plugins introduce more strongly present “artifacts”. That is to say, they introduce additional sounds or additional qualities of sound in the result that sound kind of artificial and speak more to the nature of the plug-in, the nature of the sound processing, than they do to either our desired or undesired sounds.
So if we use these spectral noise plugins and we really ask them to do a lot of work, we're going to have to really listen closely to make sure that we're not making the result sound kind of artificial, to make sure that we're not introducing artifacts alongside whatever it is that we're trying to keep or remove.
Strategy #12: And a final (and perhaps this is the least effective strategy of all of our 12 strategies for dealing with noise), a final reparative strategy, is simply to attempt to mask the noise with other sounds. Noise tends to be readily audible when we're listening to just that recording, but if in our final project it's going to be Combined with other tracks, it's very possible that the sounds from those other tracks are going to mask what we might experience as noise. Clearly this is going to be something that only applies in certain situations and projects, and not in many others. That's why it's ranked as the least important or the least viable strategy for dealing with noise.