MEDIAART 2G03: The digital recording chain and headroom
The digital recording chain
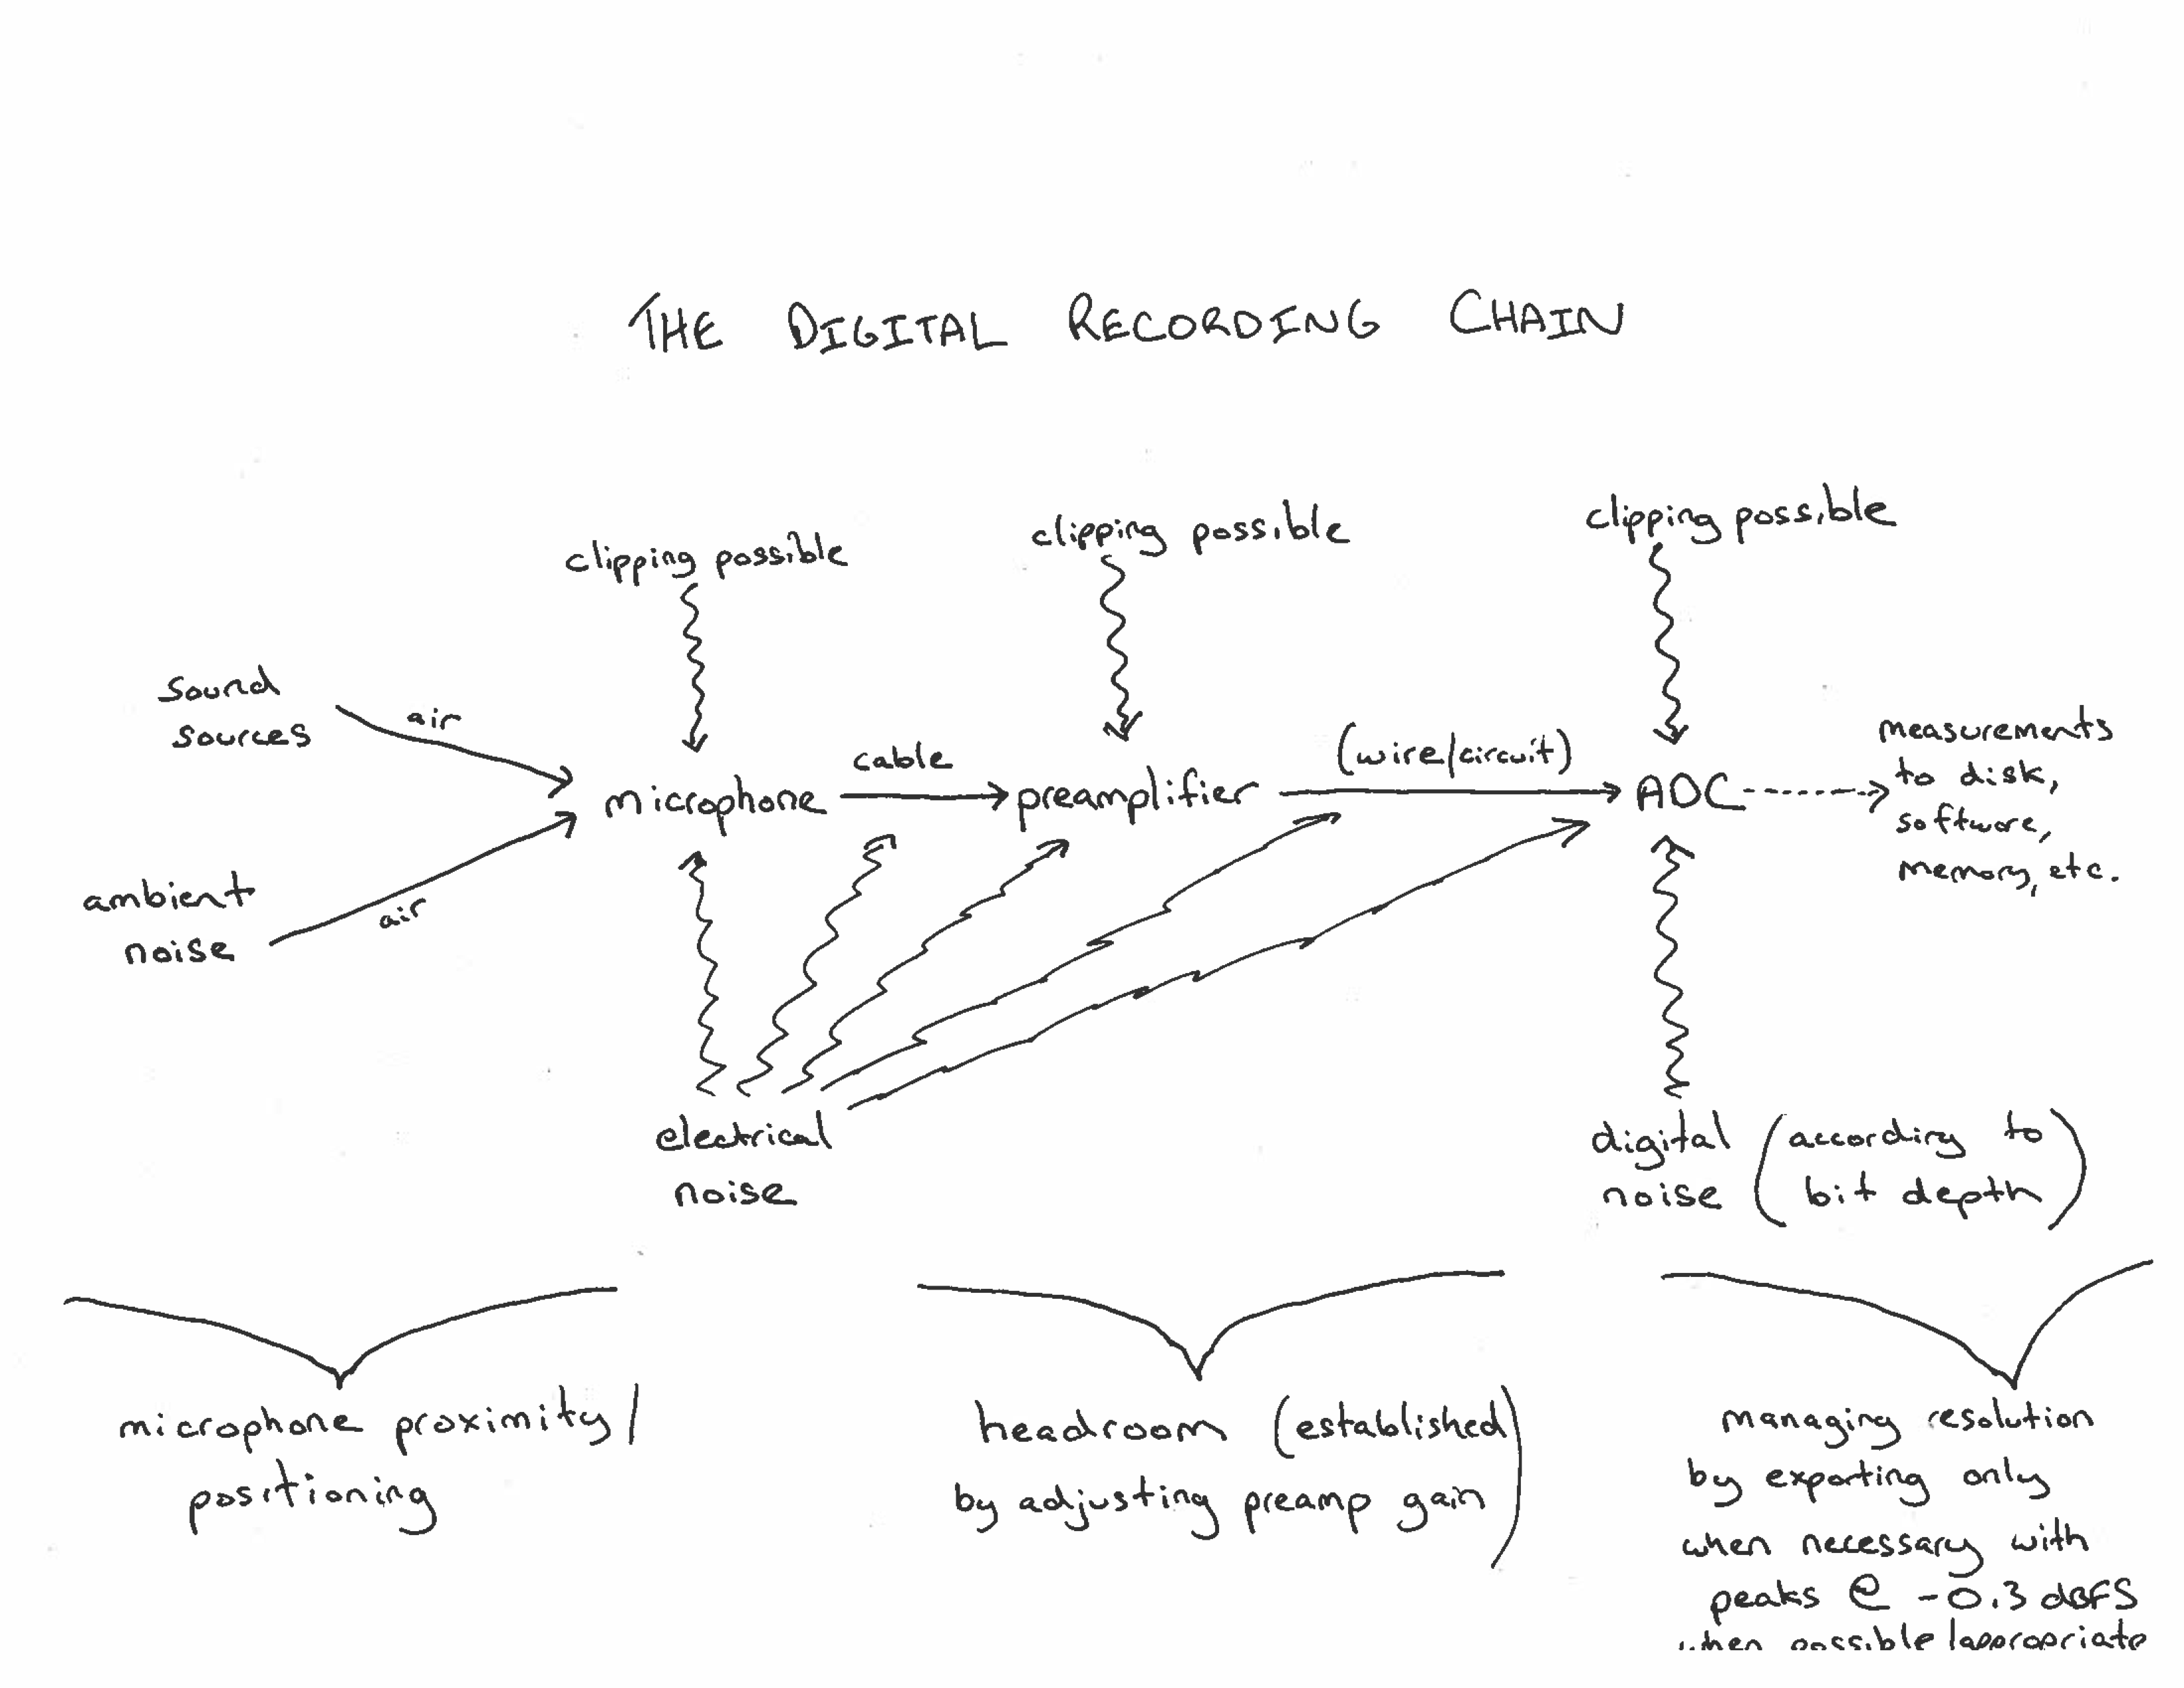
The diagram below shows a typical chain of connections when someone makes a recording with digital recording hardware (such as a field recorder, or a microphone or microphones connected to an audio interface). Sometimes these connections are not completely visible because they are hidden inside a single device, but even when the connections are completely hidden, this is still basically always how digital audio recording works.
-
Source + Air: The chain starts with a sound source (or rather, sound sources) somewhere that is/are making air molecules vibrate. Those vibrations travel through the air, as air pressure waves, in a similar way to how ripples in a pond of water spread out when a stone is thrown in. In practice, in real-world situations, including controlled spaces like recording studios, there are always multiple sound sources generating vibrations (but not necessarily with the same power or intensity).
-
Microphone: Those air pressure waves arrive at a microphone. A microphone is one example of a “transducer”, which means something that converts energy or vibrations in one medium into energy or vibations in another medium. A microphone is a device that transduces acoustic energy (from air pressure waves) into electrical energy (voltage).
-
Preamplifier: The voltage that the microphone itself produces is usually very, very small (for example: ranging between –0.001 and 0.001 volts). For this reason, the next step in the chain is that this tiny voltage goes into a preamplifier, which is an electrical circuit that makes the tiny voltages from the microphone into somewhat larger voltages (for example: ranging between –1 and 1 volts). Keeping in mind that those are rough figures, that’s about a thousand times larger, or +60 dB of “gain”! There are couple of reasons it’s necessary to make the tiny signal from the microphone larger: (1) the larger signal will be less vulnerable to noise introduced by random (or not random) radio interference in the environment, and also less vulnerable to other small, random noise inherent in the electronics themselves; and (2) the larger signal will be easier to sense/measure in the next stage.
The preamplifier is usually under our control. Many recording devices will have something called “gain” or “recording level” or perhaps other names. What such controls do is to change how much amplifying the preamplifier does, in order to influence how large the resulting electrical signal is. Setting the gain/recording level, or in other words, controlling exactly how much bigger the signal from the microphone is going to be made, is an important parameter to learn to control.
- ADC: After the preamplifier, the larger electrical voltage goes into a circuit called an “analog to digital converter” or ADC (often pronounced “eh-dack”). The ADC is another kind of transducer – one that converts electrical voltage into a series of numerical measurements of how high or low that voltage is. The ADC has a fixed range – a fixed, maximum distance from 0V that it can measure. If the voltage goes beyond that range (above the maximum positive voltage, or below the minimum negative voltage) it will just measure that as being the maximum or minimum. In other words, it will clip – and that sonic information about the shape of the vibrations, when they were out of range, will forever be lost. This is why the preceding stage, the preamplifier, has a gain/recording level control: as a way of adjusting things so that the signal received by the ADC falls nicely inside its range of measurement. I’ll have more to say about what I mean by “falls nicely inside the range” in other modules.
After the ADC, what happens next depends on what kind of device we are using. If we’re using a field recorder (or a smartphone), probably what happens is that all of those numerical measurements of the signal are stored in a file on an SD card or other storage medium. If we’re working with an audio interface connected to a computer, then software, such as a digital audio workstation (DAW), receives the measurements and does whatever its going to do with them (if we are recording, that might involve storing all those measurements in a WAV file that is created as we record).
Headroom
In the typical chain for digital audio recording (discussed above), the last stage is where the electrical voltage coming from out of the preamplifier goes to the ADC (analog to digital converter) which repeatedly measures the electrical voltage, producing numbers between a definite range for each measurement. If the ADC receives electrical voltages that are too high (too positive) or too low (too negative) it will just pretend the voltage was the maximum or minimum, and the shape of the signal beyond the limits will be forever lost. This is the most likely place that clipping will happen in a typical digital audio recording chain.
The preamplifier has a “gain” or “recording level” control, and clipping is avoided, basically, by moving the gain/recording level control so that the levels received by the ADC are not beyond the limits. Visible metres that indicate the received levels are an important aspect of this, and are integral to most audio recording hardware and software. If the received levels hit the limits (resulting in clipping/distortion, and lost “information), the metres can “tell” us that, and then we know we have to adjust things and try again (with the preamplifier gain set lower by some amount). Hopefully we are able to try again!
While avoiding clipping is normally an absolute priority (clipping is a disaster) we also don’t want the levels received by the ADC to be extremely small. If the levels were really, really small our signals would contain higher relative amounts of electrical and digital noise. We’ll talk more about that in another module, but suffice it to say that we do need the levels to be relatively close to the limits, but not so close that clipping is likely.
We need the signal that arrives at the ADC to be within the limits (to avoid clipping), and also not too far from them (to minimize electrical and digital noise in the signal). We do this by establishing what is usually called “headroom” in our recording setup. What is headroom? It is the idea that we set the preamplifier gain so that our received levels, typically during a pre-recording test, are a certain distance away from the limits. For example, if we do a test before recording, and the peak levels are at most –10 dBFS, that is 10 dB away from the limit, and we could say that we had 10 dB of headroom.
How much headroom is enough? That is a question of art and experience as much as a question of technology and science. It depends on the situation. I typically start from 10 dB of headroom as a default and then modify that based on two variables: how predictable the situation is, and how “expensive” it would be to redo a recording if it clipped.
Let’s consider the question of how predictable a situation is. If you're in a very unpredictable situation and someone could get louder at any moment or some loud thing could happen, you might want to leave more headroom, so that if that unpredictable thing happens, you don't clip. On the other hand, if you're dealing with something that's extremely predictable, you can look at the levels while testing and see exactly what they’re going to be. In that circumstance, perhaps you can reduce the headroom to 5 dB (peak levels at –5 dBFS) or even 1 dB (peak levels at –1 dBFS)
When I say “how expensive” it would be to redo a recording, this could mean different things: the cost of paying for people’s time, the cost of your own time to yourself, emotional costs like people getting frustrated... If we have something that is a one-time only recording, such as recording a highly significant public event, we might see that as something that has an infinite cost to redo, because it’s impossible to redo. As the cost of redoing a recording goes up, we should consider adding more headroom. On the other hand, if there’s really no cost to redoing something, we might consider reducing headroom. If you’re not sure, probably better to have more headroom than less, though.